 Day 2 of our Thankful Tree
 Some of my friends on Facebook post something that they are thankful for each day in November. I thought this was a good way to focus on what you have rather than what you want. So I browsed around Pinterest for some inspiration and I came up with an idea for a Thankful Tree. Every day each member of the family writes something they are thankful for on a leaf and adds it to the tree. Since there are 5 of us doing it, we will have 140 leaves by Thanksgiving. It will be fun to watch our tree grow throughout the month.
It was off to Dollar Tree. I found brown Craft Paper in the gift wrap section. They didn't have any plain brown so I picked one with a light pattern and used the back side (1 roll is enough for a good sized tree). Then over to their floral section for some bunches of fake leaves. Each stem had 16 to 20 leaves, you will need 28 leaves for each member of your family. So the total cost of this project varies depending on your family's size.
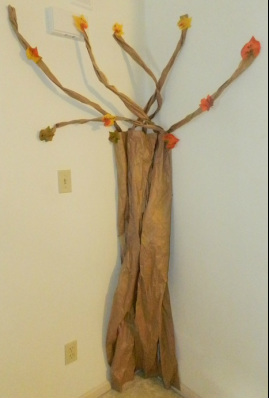
Roll out your paper and cut it in half accross the width so that you have two long pieces. Then cut each piece in half, lenghtwise. You will now have 4 long skinny pieces. Twist, roll, and crinkle 3 of the pieces to give them a bark-like texture. Then attach the pieces, at the top, to your wall with Stick Tak. Then criss-cross the three pieces and attach them again with Stick Tak to the bottom. I cut my middle piece half-way up the center (from the bottom) so that I could twist it around the other two pieces. There really is no right or wrong way to do this, just do what looks good to you.
Cut the last piece in half across the middle, then cut those two pieces into thirds, lengthwise. This will give you 6 skinny pieces. Twist those skinny pieces and attack them to the top of the trunk for the tree's branches.
It was off to Dollar Tree. I found brown Craft Paper in the gift wrap section. They didn't have any plain brown so I picked one with a light pattern and used the back side (1 roll is enough for a good sized tree). Then over to their floral section for some bunches of fake leaves. Each stem had 16 to 20 leaves, you will need 28 leaves for each member of your family. So the total cost of this project varies depending on your family's size.
Roll out your paper and cut it in half accross the width so that you have two long pieces. Then cut each piece in half, lenghtwise. You will now have 4 long skinny pieces. Twist, roll, and crinkle 3 of the pieces to give them a bark-like texture. Then attach the pieces, at the top, to your wall with Stick Tak. Then criss-cross the three pieces and attach them again with Stick Tak to the bottom. I cut my middle piece half-way up the center (from the bottom) so that I could twist it around the other two pieces. There really is no right or wrong way to do this, just do what looks good to you.
Cut the last piece in half across the middle, then cut those two pieces into thirds, lengthwise. This will give you 6 skinny pieces. Twist those skinny pieces and attack them to the top of the trunk for the tree's branches.
Clip the leaves off your bunches. All that's left is for each member of your family to write something they are thankful for and you add it to your tree. I attach mine with scotch tape, but Stick Tak or masking tape would work equally well. *Note: I cut up a cereal box and have my boys place their leaves on top of it when they write on their leaves because the Sharpie will bleed through the leaf and onto the table. By Thanksgiving you will have a tree full of thankfulness.
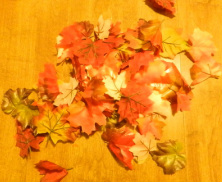 Our nice big pile of leaves. | 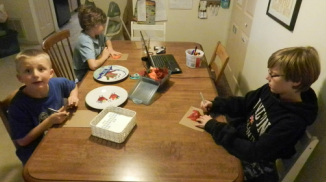 The boys writing what they are thankful for on their leaves. |
I will make sure to post a final picture of our tree at the end of the month. I'm sure it will look awesome. Hopefully it helps us stay focused on the best part of Thanksgiving... Thankfulness!

 RSS Feed